
The Triple Whale Pixel Track API enables you to record user actions on your website, along with properties that describe those actions. This comprehensive guide covers installation, event tracking, and best practices for headless stores and custom websites.
Overview
The Triple Whale Pixel captures user interactions as events, each with a unique name and associated properties. For example, a Purchase event might include properties like orderId, lineItems, and address. Installing and configuring the Triple Whale Pixel is essential for attribution tracking and analytics.
Key Concepts
- Events: User actions recorded on your website (e.g.,
AddToCart,Purchase) - Properties: Additional data describing the event context
- Page Context: Product and search information for enhanced tracking
- Attribution: Connecting user actions to marketing sources
Installation Guide
Why Manual Installation is Required
Triple Whale's Auto-Install method works seamlessly with standard e-commerce platforms. However, headless frontends and custom websites require manual installation because:
- Pages are hosted outside your primary store infrastructure
- Triple Whale lacks permissions to inject code automatically
- Custom implementations need tailored event tracking
Install the Base Tracking Snippet
Add the Triple Whale Pixel base snippet to the <head> section of all pages on your website.
Installation Process
- Navigate to Pixel Settings in your Triple Whale dashboard.
- Select the Headless Installation tab.
- Copy the base tracking snippet.
- Insert the snippet within
<head>tags on every page.
The snippet loads asynchronously and won't impact page performance.
Verification
Test your installation by:
- Opening any page with the installed pixel
- Opening browser developer console
- Typing
TriplePixel('State');and pressing Enter — expected result:Ready
Expected result: TheTriplePixelDataobject should be visible.
If you see undefined, verify:
- Code placement within
<head>tags - Cache clearing (consult your CDN or platform documentation)
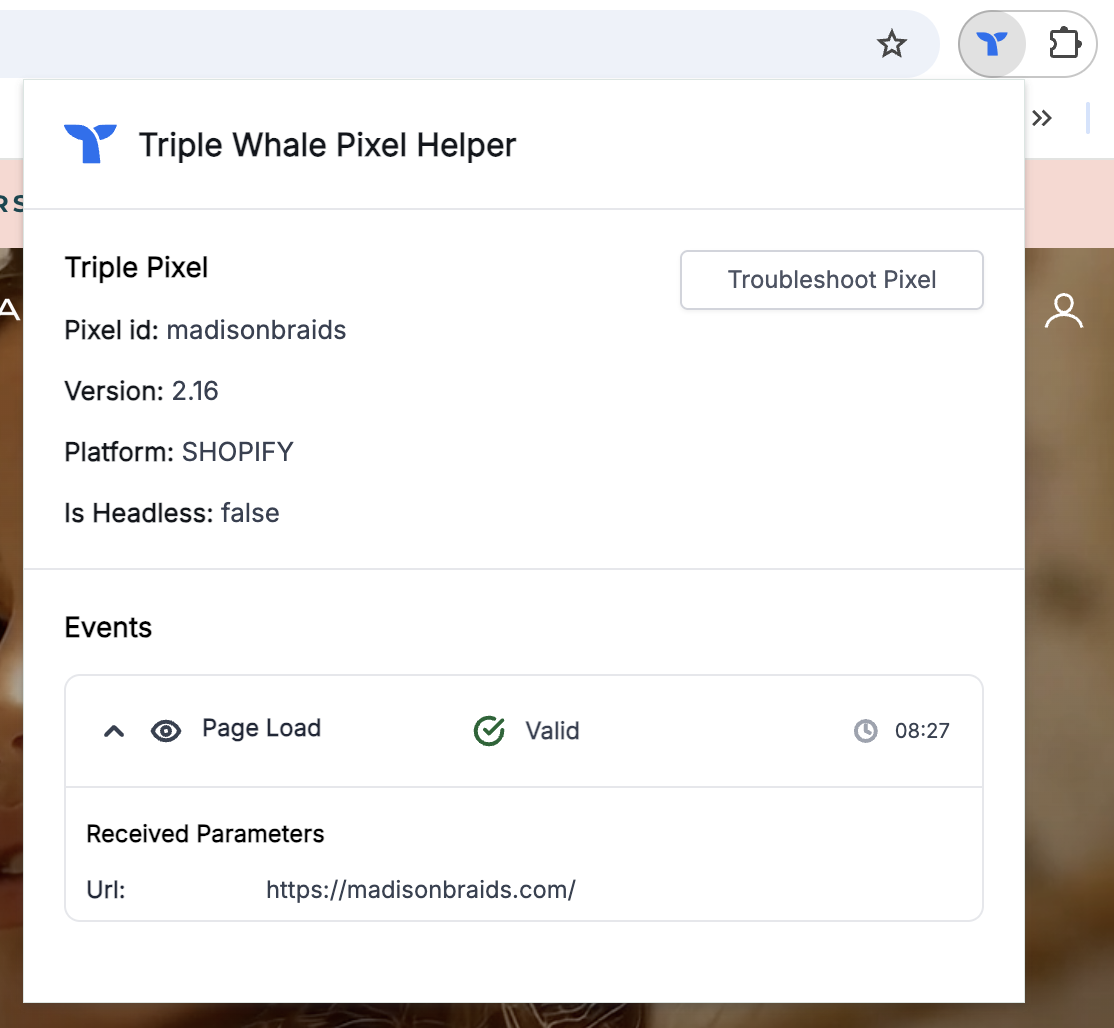
Debugging with the TW Pixel Helper (BETA)
In addition to using the browser console to verify TriplePixel('State') and TriplePixelData, you can use the TW Pixel helper Chrome extension to inspect your pixel implementation in real time.
The extension helps you:
- Confirm that the Triple Whale Pixel is installed and loaded correctly
- See which pixel events are firing on each page (standard and custom)
- Inspect event payloads (for example,
orderId,lineItems,email,phone) to make sure they contain the expected values
How to use TW Pixel helper
-
Install the extension from the Chrome Web Store: TW Pixel helper
-
Navigate to your storefront URL and open the TW Pixel helper extension, from the Extensions menu (jigsaw icon to the right of your address bar).
-
Walk through a typical customer journey in your custom shop (for example, view a product → add to cart → start checkout → complete a test purchase in a test environment).
-
Use the extension to verify that:
- The pixel is detected and active
- The expected events are firing at each step
- Each event includes the properties you rely on for attribution (such as
orderId,emailorphone, andlineItems)
This gives you a clear, visual way to confirm that the pixel is behaving as expected, without needing to dig through network logs or browser dev tools.
Core API Methods
Identifying Visitors
Capture visitor information when users provide personal details through forms or account creation.
Syntax
TriplePixel('Contact', {
  email: '[email protected]',   // Required: email OR phone
  phone: '+1-555-123-4567'
});
Field Specifications
| Field | Type | Required | Description |
|---|---|---|---|
email | String | Conditional | User's email address |
phone | String | Conditional | User's phone number |
Note: At least one identifier (
phone) must be provided.
Standard Events
The Triple Whale Pixel supports a comprehensive set of standard e-commerce events.
Page Load
Automatically captured on initial page load. For Single Page Applications or manual tracking:
TriplePixel('pageLoad')Add to Cart
Track product additions to the shopping cart:
TriplePixel('AddToCart', {
  item: '1234567',     // Product ID (Required)
  q: 1,                // Quantity (Required)
  v: '654321'          // Variant ID (Required)
});
Shopify Note: Find product IDs in the URL when editing products in your Shopify dashboard.
Page Context Configuration
Enhance tracking accuracy by providing contextual information about the current page.
Required for Sonar EventsSonar cannot fire key events unless page context is provided.
TriplePixelData.productis required forproductView (ViewContent)events.TriplePixelData.searchis required for search-related events.
Product Page Context
Update the TriplePixelData object on product pages to provide product details for on-page actions:
window.TriplePixelData = {
  TripleName: 'myshop.com',
  isHeadless: true,
  plat: 'custom-msp',
  product: { id: '48269676624115', name: 'Premium Widget', price: '42.99', variant: '8218652206806' }, // Optional
  search: '', // Optional
  ver: '2.16'
};
Search Results Context
Capture user search behavior by updating the search property:
window.TriplePixelData = {
  TripleName: 'myshop.com',
  isHeadless: true,
  plat: 'custom-msp',
  product: {}, // Optional
  search: 'wireless headphones', // Optional
  ver: '2.16'
};
Checkout Funnel Events
Track the complete checkout journey with these sequential events. While most fields are optional, providing comprehensive data improves attribution accuracy.
Checkout Started
Required for Sonar Initiate Checkout event.
TriplePixel('checkoutStarted', {
  eventId: 'evt_sub_001',              // ID for cross-platform dedupe (Optional)
  email: '[email protected]',           // At least one of email or phone (Required)
  phone: '+1-555-123-4567',
  firstName: 'John',                   // Optional
  lastName: 'Doe',                     // Optional
  orderId: 'order_0000',               // System order ID (Optional)
  cotkn: '121212121212',               // Used for order<>journey matching (Optional)
  lineItems: [{
   i: '1234567', // Product ID (Required)
   q: 1,         // Quantity (Required)
   v: '654321'   // Variant ID (Required)
  }],
  address: { zip: '67676', city: 'Sterling', countryCode: 'US', provinceCode: 'KS'}		// Optional
});
Contact Information Submitted
TriplePixel('contactSubmitted', {
  eventId: 'evt_sub_001',              // ID for cross-platform dedupe (Optional)
  email: '[email protected]',           // At least one of email or phone (Required)
  phone: '+1-555-123-4567',
  firstName: 'John',                   // Optional
  lastName: 'Doe',                     // Optional
  orderId: 'order_0000',               // System order ID (Optional)
  cotkn: '121212121212',               // Used for order<>journey matching (Optional)
  lineItems: [{
   i: '1234567', // Product ID (Required)
   q: 1,         // Quantity (Required)
   v: '654321'   // Variant ID (Required)
  }],
  address: { zip: '67676', city: 'Sterling', countryCode: 'US', provinceCode: 'KS'}		// Optional
});
Address Events
Billing Address Submitted
TriplePixel('addressSubmitted', {
  eventId: 'evt_sub_001',              // ID for cross-platform dedupe (Optional)
  email: '[email protected]',           // At least one of email or phone (Required)
  phone: '+1-555-123-4567',
  firstName: 'John',                   // Optional
  lastName: 'Doe',                     // Optional
  orderId: 'order_0000',               // System order ID (Optional)
  cotkn: '121212121212',               // Used for order<>journey matching (Optional)
  lineItems: [{
   i: '1234567', // Product ID (Required)
   q: 1,         // Quantity (Required)
   v: '654321'   // Variant ID (Required)
  }],
  address: { zip: '67676', city: 'Sterling', countryCode: 'US', provinceCode: 'KS'}		// Optional
});
Shipping Address Submitted
TriplePixel('shippingSubmitted', {
  eventId: 'evt_sub_001',              // ID for cross-platform dedupe (Optional)
  email: '[email protected]',           // At least one of email or phone (Required)
  phone: '+1-555-123-4567',
  firstName: 'John',                   // Optional
  lastName: 'Doe',                     // Optional
  orderId: 'order_0000',               // System order ID (Optional)
  cotkn: '121212121212',               // Used for order<>journey matching (Optional)
  lineItems: [{
   i: '1234567', // Product ID (Required)
   q: 1,         // Quantity (Required)
   v: '654321'   // Variant ID (Required)
  }],
  address: { zip: '67676', city: 'Sterling', countryCode: 'US', provinceCode: 'KS'}		// Optional
});
Payment Submitted
TriplePixel('paymentSubmitted', {
  eventId: 'evt_sub_001',              // ID for cross-platform dedupe (Optional)
  email: '[email protected]',           // At least one of email or phone (Required)
  phone: '+1-555-123-4567',
  firstName: 'John',                   // Optional
  lastName: 'Doe',                     // Optional
  orderId: 'order_0000',               // System order ID (Required)
  cotkn: '121212121212',               // Used for order<>journey matching (Optional)
  lineItems: [{
   i: '1234567', // Product ID (Required)
   q: 1,         // Quantity (Required)
   v: '654321'   // Variant ID (Required)
  }],
  address: { zip: '67676', city: 'Sterling', countryCode: 'US', provinceCode: 'KS'}		// Optional
});
Required for Meta Sonar Optimize Add Payment Info event.
Purchase Events (Required for Attribution)
The purchase event is critical for attribution tracking and must be implemented on order confirmation pages.
TriplePixel('Purchase', {
  eventId: 'evt_sub_001',              // ID for cross-platform dedupe (Optional)
  email: '[email protected]',           // At least one of email or phone (Required)
  phone: '+1-555-123-4567',
  firstName: 'John',                   // Optional
  lastName: 'Doe',                     // Optional
  orderId: 'order_0000',               // System order ID (Required)
  cotkn: '121212121212',               // Used for order<>journey matching (Optional)
  lineItems: [{
   i: '1234567', // Product ID (Required)
   q: 1,         // Quantity (Required)
   v: '654321'   // Variant ID (Required)
  }],
  address: { zip: '67676', city: 'Sterling', countryCode: 'US', provinceCode: 'KS'}		// Optional
});
Attribution Requires Both Pixel and Order DataTriggering a
purchaseorNewSubscriptionevent alone will not initiate attribution. Triple Whale must also receive a matching order record to complete the attribution process:
- For Shopify and other native platforms, the order is received automatically via webhook.
- For Custom Sales Platforms, you must send the order via the Orders API endpoint.
To maximize attribution accuracy, we recommend sending the Pixel event before the order is submitted via API. While sending the order first still works, it may increase the likelihood of orders that cannot be matched to a Pixel event—resulting in fewer attributed conversions.
Subscription Events
Track subscription-based orders and recurring billing signups:
TriplePixel('NewSubscription', {
  eventId: 'evt_sub_001',              // ID for cross-platform dedupe (Optional)
  email: '[email protected]',           // At least one of email or phone (Required)
  phone: '+1-555-123-4567',
  firstName: 'John',                   // Optional
  lastName: 'Doe',                     // Optional
  orderId: 'order_0000',               // System order ID (Required)
  subscriptionId: 'sub_0123',          // System subscription ID (required)
  cotkn: '121212121212',               // Used for order<>journey matching (Optional)
  lineItems: [{
   i: '1234567', // Product ID (Required)
   q: 1,         // Quantity (Required)
   v: '654321'   // Variant ID (Required)
  }],
  address: { zip: '67676', city: 'Sterling', countryCode: 'US', provinceCode: 'KS'}		// Optional
});
Initial Signups vs. RenewalsIf a customer signs up for a subscription during their initial purchase, you must trigger both a
purchaseevent and aNewSubscriptionevent. These represent two distinct actions: the transaction and the subscription creation.For recurring renewals (rebills), no Pixel events are required. Since these happen without a web session, they should be sent via the Orders API, using the appropriate
subscription_idto associate each order with the original subscription.
Custom Events
Create tailored events specific to your business needs and define them directly within the Triple Whale App.
Note: Custom events can be designated as conversion events in your Triple Whale settings for attribution tracking.
Add to <head> after the base snippet
<head> after the base snippetWith custom events, you can track any type of event that is relevant for your business. Custom events can have whatever name you choose, and support passing any custom property that is relevant for that event.
TriplePixel('custom', 'scheduleDemo', {
  'action': 'booked_demo',
  'version': '1.0',
  'shop': 'example-shop.myshopify.com',
  'email': '[email protected]',
  'firstName': 'John',
  'lastName': 'Doe',
  'phone': '+1-555-123-4567'
});
Only the event name (scheduleDemo in the example) is required. All parameters/fields are optional and can be whatever you'd like to track with the event.
Custom Events can also be marked as ‘conversion events’ in your settings to enable attribution for these events.
For more information on setting up and tracking custom events, see the Tracking Custom Events knowledge base article.
Context Field Reference
Base Context Properties
| Field | Type | Description | What happens when missing |
|---|---|---|---|
TripleName | String | Your store domain | Pixel will not execute until provided |
plat | String | Platform identifier (e.g., 'SHOPIFY', 'CUSTOM') | Defaults to 'shopify' if omitted, which may send data to the wrong shop. |
product | Object | Product details for the current page | In Sonar: productView events may fail or lack data. |
search | String | User's search query | Affects Sonar search events only. |
Common Event Properties
| Field | Type | Required | Description |
|---|---|---|---|
eventId | String | Optional | Unique identifier for cross-platform deduplication |
email | String | Conditional | Customer email address |
phone | String | Conditional | Customer phone number |
firstName | String | Optional | Customer's first name |
lastName | String | Optional | Customer's last name |
orderId | String | Required* | Unique order identifier (*for purchases) |
subscriptionId | String | Optional | Subscription identifier |
cotkn | String | Optional | Used for order<>journey matching |
lineItems | Array | Recommended | Array of product IDs or SKUs |
address | Object | Optional | Customer address info |
Product Context Properties: Automatically collected by the main pixel snippet.
Note: Merchants must provide product details via
TriplePixelDataor as properties for apageLoadevent (SPA).
Address Object Properties
| Field | Type | Description |
|---|---|---|
address.zip | String | Postal/ZIP code |
address.city | String | City name |
address.countryCode | String | Country code (ISO 3166-1 alpha-2) |
address.provinceCode | String | State/Province code |
Single Page Applications (SPAs)
SPAs require special handling for page transitions and context updates.
Capturing Page Views
Trigger page view events after navigation:
TriplePixel('pageLoad');Managing Context in SPAs
Option 1: Context with Event
TriplePixel('pageLoad', {
  product: { id: '123456', name: 'Premium Widget', price: '29.80', variant: '098765345' },
  search: 'widgets',
  collection: '012345678'
});
Option 2: Update Global Object
window.TriplePixelData.product = { id: '48269676624115', name: 'Premium Widget', price: '42.99', variant: '8218652206806' };
TriplePixel('pageLoad');
window.TriplePixelData.product = {};
Privacy and Consent Management
Respect user privacy preferences with consent management.
Disable Tracking
TriplePixel('trackingConsent', false);Enable Tracking
TriplePixel('trackingConsent', true);Best Practices
Event Naming Conventions (Custom Events)
- Use descriptive, human-readable names
- Follow the pattern: Noun + Past Tense Verb
- Avoid generic names like Event1 or cryptic codes
Data Quality
- Include all available fields for better attribution
- Use consistent product/variant IDs
- Use
eventIdwhen sending to multiple platforms - Test events in the dashboard before production
Performance Optimization
- The pixel loads asynchronously by default
- Batch multiple events where possible
- Implement at the right lifecycle stage
- Cache context to reduce repeated calls
Error Handling
if (typeof TriplePixel !== 'undefined') {
  TriplePixel('AddToCart', { /* ... */ });
} else {
  console.error('Triple Whale Pixel not loaded');
}
Implementation Checklist
-
Base snippet in
<head>on all pages -
Pixel verified via console
-
Contact event on forms
-
Add to Cart tracking active
-
Checkout funnel events configured
-
Purchase event on confirmation page (critical)
-
Product context on product pages
-
Search context on search pages
-
SPA transitions tracked
-
Consent management set up
-
Events verified in dashboard
Platform-Specific Notes
Tag Managers
Triple Whale Pixel works with most tag management tools. Refer to your tag manager’s documentation for setup.
Mobile Websites
If your mobile site is separate from desktop:
- Install the pixel on both
- Use consistent event naming
- Maintain same user identifiers across platforms
Troubleshooting
Common Issues
| Issue | Solution |
|---|---|
TriplePixelData undefined | Verify snippet placement in <head>, clear cache |
| Events missing | Check console errors, ensure pixel initialized |
| Missing attribution | Ensure purchase event includes all required fields |
| SPA gaps | Implement manual pageLoad events on route changes |