
Bucket and Permissions Setup
To export data from Triple Whale to AWS S3, you must create an S3 bucket, configure an IAM user, and grant the necessary permissions. This guide walks you through the setup process to ensure a seamless connection.
Step 1: Create an S3 Bucket
- Open the AWS Console and navigate to S3.
- Click Create bucket.
- Enter a Bucket Name (e.g.,
triplewhale-data), and configure additional settings as needed. Learn more about creating S3 buckets. - Click Create bucket to finalize.
Step 2: Create an IAM User
- Open the AWS Console and navigate to IAM.
- In the left-hand menu, click Users.
- Click Create user.
- Enter a User name (e.g.,
triplewhale-s3-user). - Click Next to proceed.
Step 3: Create a Custom IAM Policy
-
On the Permissions page, click Attach policies directly and then Create policy.
-
Select the JSON tab and replace the content with the following, updating
<your-bucket-name>:{ "Version": "2012-10-17", "Statement": [ { "Sid": "VisualEditor0", "Effect": "Allow", "Action": ["s3:PutObject", "s3:GetObject", "s3:ListBucket"], "Resource": [ "arn:aws:s3:::<your-bucket-name>", "arn:aws:s3:::<your-bucket-name>/*" ] } ] } -
Click Next, enter a Policy name (e.g.,
TripleWhaleS3Policy), and click Create policy.
Step 4: Attach the Policy to the IAM User
- Return to the IAM User creation page.
- Click the Refresh button next to the policy list.
- Search for the newly created policy (e.g.,
TripleWhaleS3Policy) and select its checkbox. - Click Next and then Create user.
Step 5: Generate and Download Access Keys
- Go to IAM → Users.
- Click on the newly created user (e.g.,
triplewhale-s3-user). - Navigate to the Security credentials tab.
- Scroll to the Access keys section and click Create access key.
- Select Third-party service as the use case.
- Confirm and click Create.
- Click Download .csv file to save the credentials securely.
Step 6: Identify the AWS Region
- Look at the AWS Console URL (e.g.,
https://<region>.console.aws.amazon.com). - The
<region>in the URL indicates your AWS region (e.g.,us-east-1,eu-west-1).
Connecting to Triple Whale
Once the AWS S3 setup is complete, connect it to Triple Whale so it can be used as a Data Warehouse Export destination.
-
Go to the Data Warehouse Export page.
-
Click Connect on the AWS S3 integration.
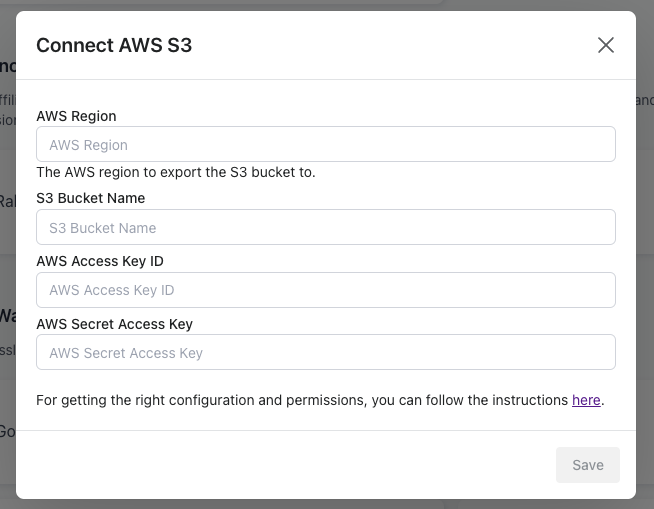
Connecting AWS S3 to Triple Whale.
-
Enter the following details:
- Region: Found in Step 6.
- Bucket Name: Enter the bucket name created in Step 1 (e.g.,
triplewhale-data). - AWS Access Key ID: Found in the
.csvfile from Step 5. - AWS Secret Access Key: Found in the
.csvfile from Step 5.
-
Click Save.
Creating a Data Warehouse Export
After connecting your AWS S3 destination to Triple Whale, you can export data using the Data Warehouse Export feature.
-
Go to the Data Warehouse Export page.
-
Click New Export, then select your connected AWS S3 destination and specify a New Table ID.
Exported files will be written to your selected S3 bucket.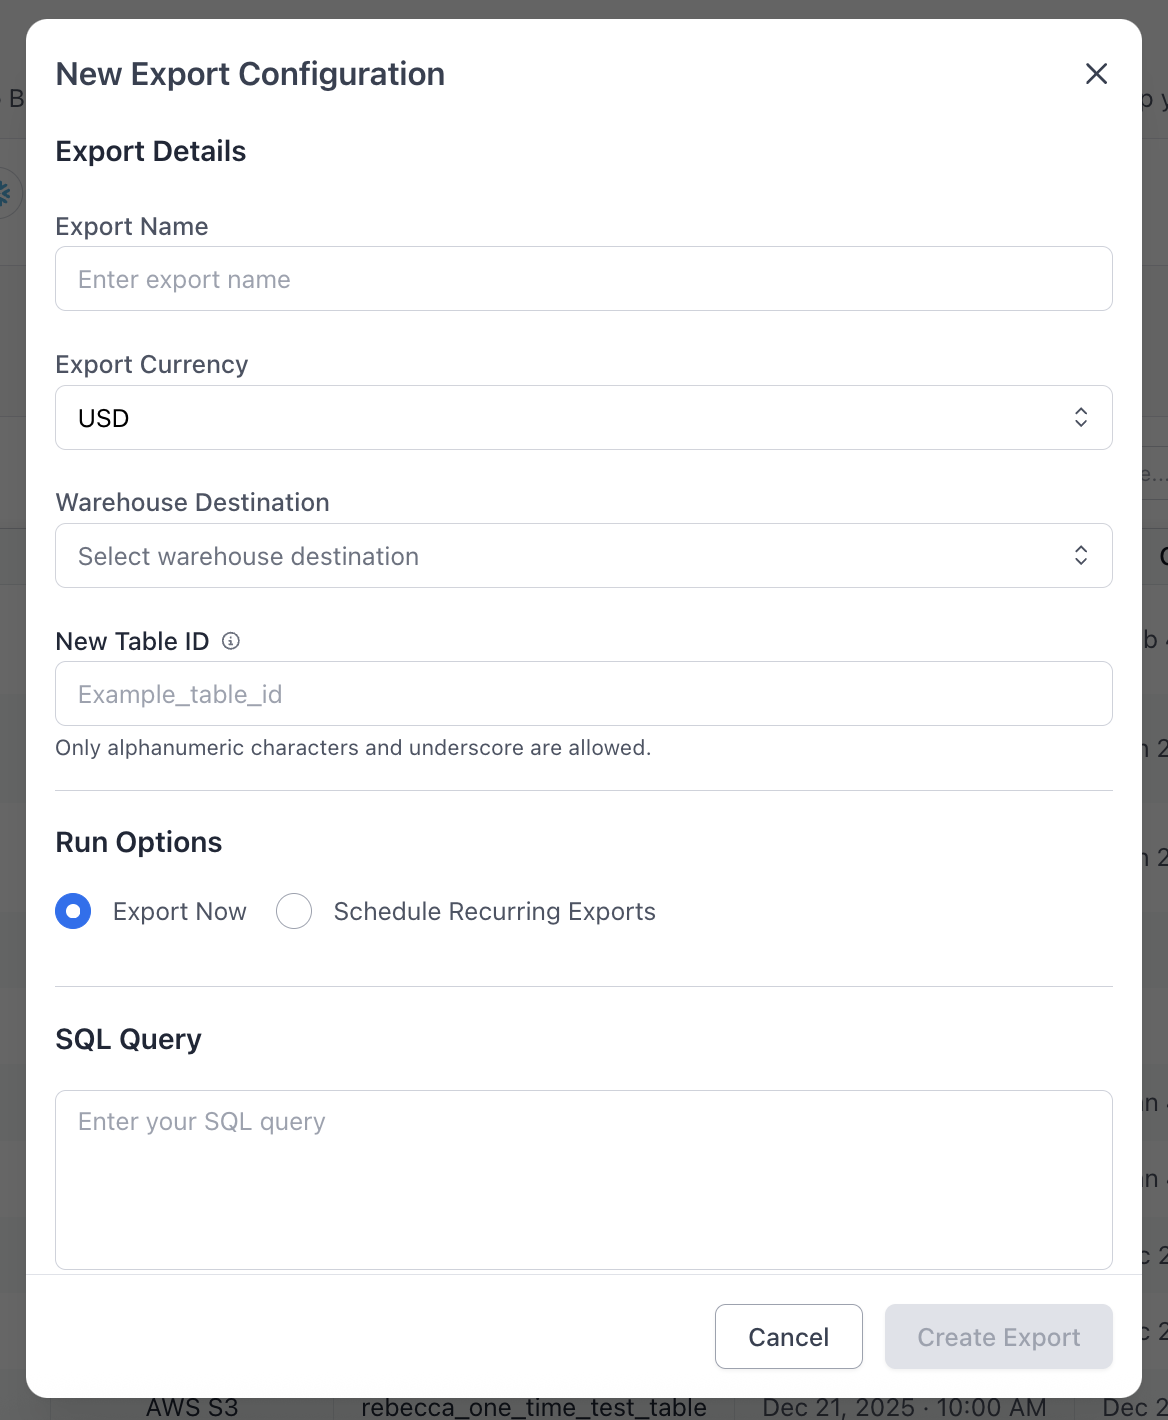
-
Define the SQL Query whose results should be exported to AWS S3.
Select Specific ColumnsAvoid using
SELECT *. Triple Whale’s schema is dynamic, and wildcard selection can lead to broken or inconsistent results as fields change. Always specify the exact columns you need. -
Choose How the Export Runs – You can either:
- Export Now to run a one-time export, or
- Schedule Recurring Exports (for example, hourly or daily) to configure automated recurring exports.
-
Create Export – Once saved, the export will either run immediately or on its configured schedule and write new data to your S3 bucket.
Troubleshooting
Common Errors and Fixes
- "Access Denied": Ensure the IAM user has the correct permissions. Go to IAM > Policies and verify that the
TripleWhaleS3Policyis assigned.- "Bucket Not Found": Confirm that the correct bucket name was entered in the integration settings.
- "Invalid Credentials": Check that you are using the correct AWS Access Key ID and AWS Secret Access Key from the downloaded
.csvfile.